In this article we will learn how to download and install MongoDB Compass MongoDB Compass, the GUI for MongoDB in windows.
MongoDB Compass is GUI for MongoDB, which help us to Visually explore our data. Run queries in seconds. Perform full CRUD functionality with your data. You can also View and optimize your query performance and this GUI is Available on Linux, Mac, or Windows.
Let's see how to download and install it on Windows 10:
Go to the official website of MongDB (https://www.mongodb.com) and navigate to the software section where you will find option for Compass GUI for MongoDB,
You will be redirected to the product page as shown below click on Try it now button,
On the next page you will be asked to select the suitable version or package for yourself as there are multiple options available as:
- You can select different version but personally I'll recommend you to go with the stable version (for now latest and stable version is 1.26.1).
- You need to select your platform/ Operating system like. Windows, RedHat, ubuntu or OSX whatever the platform you prefer.
- Third one showing you the package as zip or EXE, this one is depend upon the option you choose with platform.
Select the most suitable option and click on download button.
If you choose to download the zip file then download and extract that file into a folder and find the executable file named 'MongoDBCompass.exe' or if you downloaded the EXE file then just double click on it and it will be install in a few minutes and will be ready to use.
Click on the Get Started button.
Next phase will ask you for the connection string, do not worry about that if you don't have that yet you can always create you new cluster and then generate your connection string just click on CREATE FREE CLUSTER button.
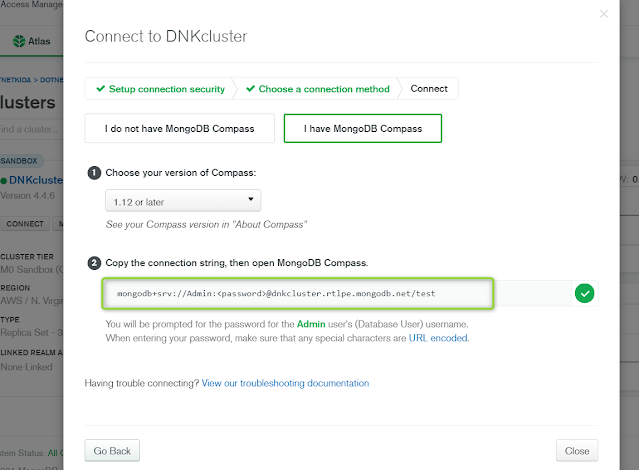
How to get your connection string? for that you need to login into your MongoDB Atlas account and create your own cluster then click on Connect and you will be prompt to select how do you want to connect, you can connect using mongo shell, connect through an application or Connect using MongoDB Compass. Click for MongoDB Compass.
Now you have two options there select whichever suits you:
I don't have MongoDB Compass,
I have MongoDB Compass,
There you go, you found your connection string over there on the screen just copy that connection string and paste it over there after that just click on connect.
Note: Connection string will be in this format 'mongodb+srv://Admin:<password>@yourcluster.rtlpe.mongodb.net/test' replace <password> with your password.


0 Comments